
This post will show how to connect to your Database as a Service environment running in our Oracle Cloud using Oracle SQL Developer.
The screenshots below and demonstration steps are written with version 4.1.1 of SQL Developer.
We (Oracle) basically have 2 types of Database services you can run in our cloud:
- Schema – known as Database Schema Service
- Database – known as Database as a Service (DBaaS)
I’ll be talking about the DBaaS offering and connectivity with SQL Developer. Technically speaking we have 3 services to choose from – we just launched the awesome Exadata Service. Note that everything you see below re: DBaaS will also apply to the Exadata Service.
Which Service is for Me?
If you don’t need an entire database, and just need a place to park your database objects for your web application, then the Schema Service is perfect for you. We also have multiple OTHER cloud services at Oracle that run on top of the Schema Service, include the Business Intelligence Cloud Service (BICS.) It’s also idea if you want to run an Application Express application in our Cloud.
The Schema service doesn’t give you low level access to the OS or to the database. You don’t have to worry about these things either – we take care of it for you. If you’re looking for connectivity via SQL Developer instructions, then here you go. But this post is about DBaaS and SQL Developer.
So, if you need an entire database, with root, and DBA level access, then our DBaaS is for you.
You may be tempted to skip ‘the docs’ and just jump into SQL Developer and go, go, go – but don’t do that.
Ok, now that we have that out of the way, let’s get back to DBaaS and SQL Developer.
DBaaS is just a database
Apart from it being the best database management system available today, running in the best Cloud environment DESIGNED FROM THE BEGINNING to run Oracle Database – it’s just a database. By that I mean, it’s the same database you run at home, on-premise, legacy…you get the drill.
So nothing new to learn here.
But.
It’s running on the Internet. So we don’t open up all the ports, that would be less-than-awesome network security. One of the ports not opened by default is 1521. 1521 is the default port the database listener services connection requests with. By the way, I hate ending sentences with a preposition, but this is a blog post, not a term paper.
One of the ports we do have open is port 22.
SSH Tunnel Into Your Database
We added native SSH tunneling support in SQL Developer in version 4.0 – explicitly for the DBaaS customers.
So basically, we can create a connection on port 22 of the DBaaS virtual machine running your database, that then forwards the traffic from SQL Developer to port 1521 on the same virtual machine.
We added this feature in version 4.1, in that version, there was an advanced button in the connection property where you could define/create the tunnel.
In version 4.1, we changed this quite a bit to make it more flexible – basically such that you could create one tunnel for MULTIPLE connections/databases.
Oracle ACE Danny Bryant has a nice overview of the differences between 4.0 and 4.1 specific to the tunneling – which is very handy for users whether they are DBaaS customers or not.
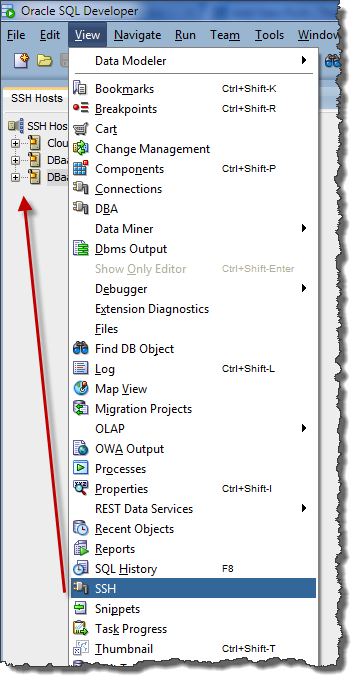
View – SSH
Add a SSH Host
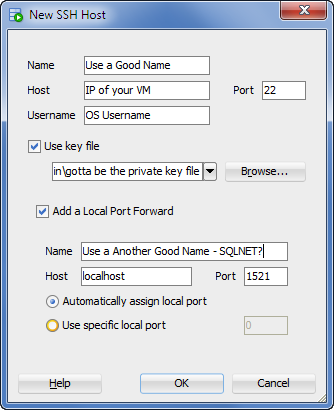
- Name – name of the tunnel, can be anything
- Host – the network location of your virtual machine running your database
- Username – OS user on the vm you’re connecting with over SSH
- Port – the port to use for SSH, has to be 22 (unless you go into the vm and change this to something else)
- Use key file – yes, we require this and you’ll need to use the private key file we give you as well
- Add a Local Port Forward – yes, this is how the traffic gets from port 22 over to the Listener port
- Name – name of the actual port forward, you can create more than one, for different ports and services
- Host – this could be a machine somewhere else on the network your VM is running on, but we’re staying on the localhost, cause that’s where your database is
- Port – the listener port, which is running on 1521
- Automatically assign local port – this is fine unless you need have the tunnel end at a specific port
The Database Connection
You’re going to need to create a database connection, just like you always have. Except now, the connection type will be ‘SSH.’
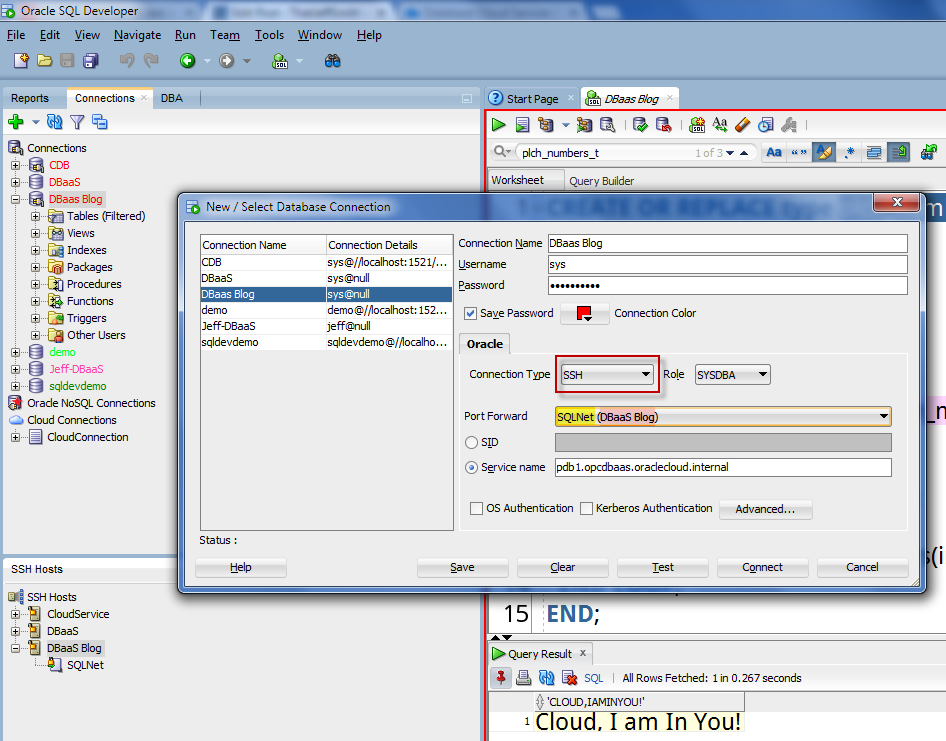
Remember back in the previous section where I said to use good names for your tunnel and port forward? Those names are reflected in the yellow and pink highlighted text in the screenshot above.
If you have more than one port forward for the tunnel, you’ll see all of those listed in the drop-down selector.
Ready to connect and rock-n-roll!
When you connect the first time, we’re going to open the tunnel. When the tunnel is established, we’ll send over your key and you will get prompted for the ‘passhrase.’ Supply it, and the tunnel gets opened, and we’ll automatically do the database connection over the tunnel.
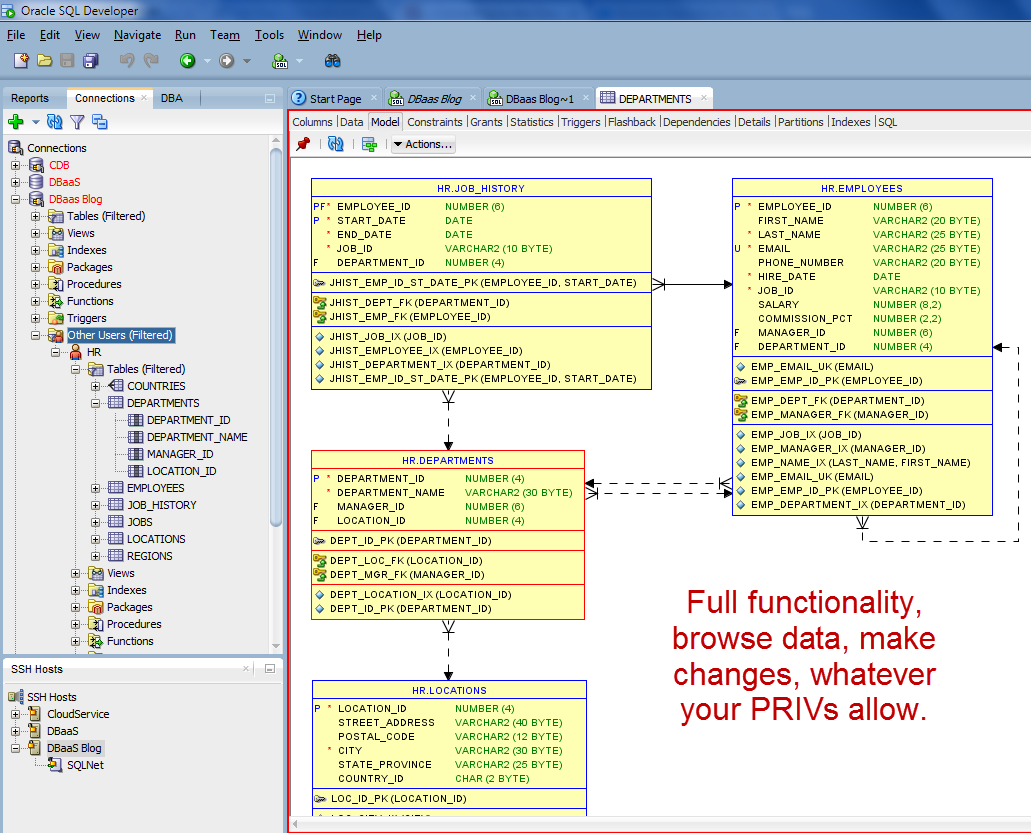
And like I said, this is a database, just like any other database you’ve worked on before – it’s just now running in our data centers on our awesome hardware.
So I can use SQL Developer as I normally ever would:
With one exception – debugging your PL/SQL. I’ll cover that in a post later, but the PL/SQL debugger uses a sun protocol, JDWP, that actually connects from the database server down to the IDE where your debugger is running. That means you have to create a remote port forward, basically send traffic from the vm back down to your machine via the tunnel. We support this too 🙂
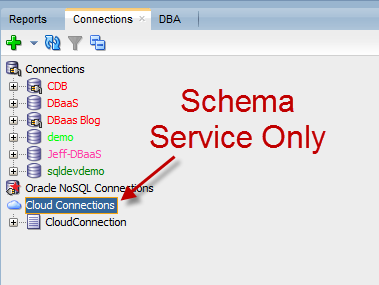
One More Thing – ‘Cloud Connections’
The connection node ‘Cloud Connections’ in the connection tree, that’s for the Database Schema Service ONLY. The database schema service doesn’t even have port 22 open, everything is done over RESTful Services (via Oracle REST Data Services running on the server.) I talk about this in great detail here if you’re curious.
In a future release, we’ll be renaming that node so it’s more clear that it’s for the Schema Service and not DBaaS. In our defense, when we built it, DBaaS didn’t exist yet.


3 Comments
Hallo Jeff,
I have used sqldeveloper’s ssh tunnel for many times and find it really useful.
Recently, however, I happened to have to use it with a connection that does not use password authentication, but simply with an rsa key. When I try the connection it asks me for the password then it goes into error even if I leave the field blank.
Note that if you create the tunnel with ssh everything works.
Am I wrong something? I can not understand.
Thanks,
Enrico
Hi
i followed the all steps mentioned in – “SSH Tunnel Into Your Database”
but when i testing the connection its giving me below error in SQL – Developer
“com.jcraft.jsch.JSchException: timeout: socket is not established”
Sql Developer Version is 17.4.0.355
This is really helpful, Wish to add one more point.
In case of private key is generated using puttygen, then better we use to convert the key with the tool puttygen to an open ssh format private key to avoid “The cipher ‘aes256-cbc’ is required” issue.